
Authentication Methods
You can authenticate using OAuth, or a Personal Access Token.
Your organization’s IT team might need to authorize the app for you to be able to connect to your account.
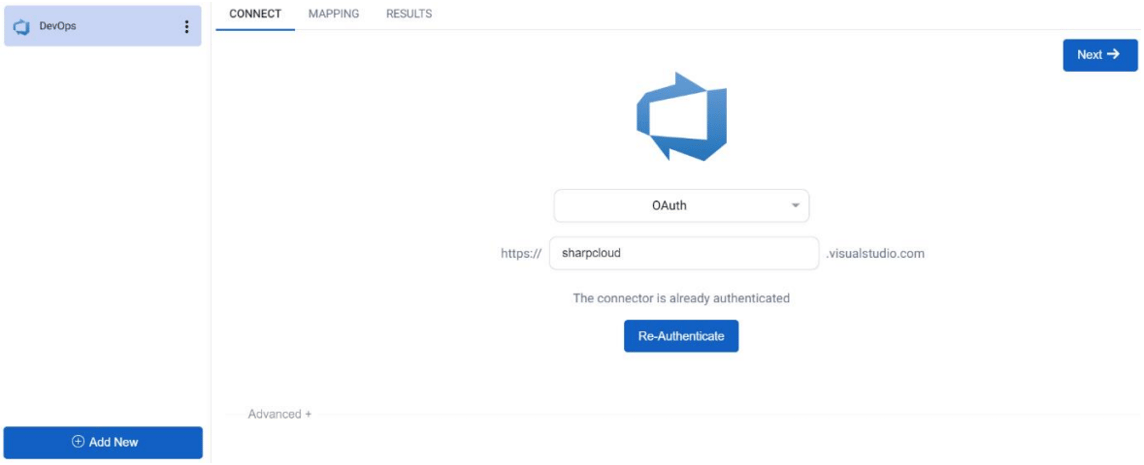
To use OAuth, select this option from the dropdown menu, and fill in your organisation’s name in the respective field, as seen below:
You will see this popup on the bottom right of your screen once the authentication has been successful.
.png?width=350&height=79&name=Jira-Software-Connector(1).png)
To use the Personal Access Token, select the option from the dropdown menu. Enter your username, Personal Access Token (PAT) and organization in the respective fields, as seen below:
.png?width=1144&height=466&name=Azure-DevOps-Connector(1).png)
Typical use-cases
Many people have data stored in DevOps that they may want to import to a SharpCloud story. This connector allows you to create, update and delete items based on data in DevOps.
How to Use the Connector
Once you have created a DevOps connector, you will be presented with the “Connect” screen (which is standard for all connectors). This is where you will carry out the authentication described above.
Once this is complete, you can now press “Next” to move to the mapping section of the connector, where you will select the table of data, which category you want to import the data into and map the fields in DevOps to the attributes in the SharpCloud story.
You can view the Source Data, which is the data from DevOps and how SharpCloud reads this by clicking on the “View Source Data” button.
.png?width=1144&height=466&name=Azure-DevOps-Connector(2).png)
You can see we are bringing in the “AgentPools” table and importing it into Category 1.
You need to nominate an External ID (a unique identifier for each item) in the “External ID” column.
A unique number is created for each row in the list which can be used for the External ID. If you are adding or deleting rows in SharePoint List, it is a lot better to bring in your own unique field and nominate that field as the External ID to avoid incorrect data mapping/loss.
For the other fields, you can either map the column to existing attributes in your story or by selecting “(NEW)” which will create a new attribute/property in your story, and you can select its type.
.png?width=1144&height=471&name=Azure-DevOps-Connector(3).png)
Note: For Tag Groups and Categories, these will need to pre-exist before mapping onto those fields – you can access the Story Setup to perform those actions from the top of the screen.
You can provide a filter on the incoming items, for example, to only create items with an "AutoProvision” value of “true” by using the dropdown on the far right as shown below:
.png?width=1144&height=470&name=Azure-DevOps-Connector(4).png)
For more advanced actions and queries, you can access the underlying SQL queries to discover and edit how you wish the data be imported and perform special functions such as JOIN. To access the SQL, simple use the toggle in the top left that says “Show Advanced SQL”:
.png?width=1144&height=466&name=Azure-DevOps-Connector(5).png)
Note: Once you edit the SQL, you will not be able to return to the dropdown version of the mapping as there are SQL functions that can be performed here that are not accommodated in the dropdown version.
Once you are happy with the mappings/SQL, press Next to show a preview of what items are going to be created and the additional information:
.png?width=1144&height=472&name=Azure-DevOps-Connector(6).png)
You can see the rows in blue are new items that will be created if you click the synchronise button. Modified values/cells (where the item value is different from the source data and SharpCloud) will be shown in orange.
Synchronise: Press this button to actually commit the changes to the SharpCloud story. If the commit is successful it will show a summary of the changes made.
Delete Records from story (Default = true): The default setting for this option is true which means deleted records from your data source (Excel workbook in this case) will be also be deleted in SharpCloud. E.g. if your data source contains records for items A, B and C, and later the data source only contains A and C, item B will be deleted from SharpCloud.
When you are happy that your connector is transferring the right data in the right way, you can "Publish” it. A published connector cannot be edited anymore, and can be run by anyone who has admin access to the story.
Note: The credentials of the user who published the connector are used to read from the data source and update the story.
.jpg?width=300&name=Website_GeneralCTA.v2(optimized).jpg)
Contact our expert team
Whether it's to discuss functionality, your subscription, or anything else, we strive to give you the best guidance.
Get in touch